With the increased complexity of today’s circuits, designers are increasingly dependent on electromagnetic (EM) simulations during the design phase. With the trend towards smaller circuits and multi-layered boards, EM simulation is needed to accurately model internal circuit interactions. The use of discrete components helps to reduce a circuit’s overall footprint but introduces a level of complexity to the design process. A good understanding of the proper EM port configurations and calibration types is required to ensure accurate EM-Circuit co-simulation results.
This application note is intended to help users of Keysight’s Advanced Design System (ADS) and Modelithics models accurately and efficiently simulate RF and microwave circuits. The focus is on finding the optimum port setup for EM simulation of circuit layouts that include surface mount devices. Several new features and improvements were introduced to Momentum, the 3D planar EM simulator in ADS, starting with the ADS 2011 release. Of particular interest are the new port calibration types and their impact on co-simulations when using Modelithics models. This application note explains the port nomenclature in ADS, presents multiple co-simulations between Momentum and Modelithics models, shows the impact of the various port shapes and calibration types, and provides recommendations based upon comparisons to measured data. The content is organized into three main areas. The first area provides detailed information concerning Momentum port types and calibration definitions. Following the calibration definitions is the results section, which includes examples that provide insight into port and calibration performance. The final section contains the recommended calibration type and the recommended port configurations.
Pins and Ports in ADS
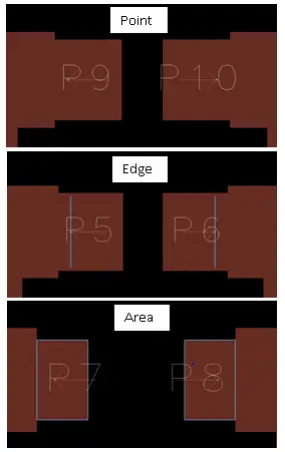
ADS 2011 introduced new port calibration types and nomenclature to Momentum. Before discussing port calibration types, it helps to understand the difference between a pin and a port. A layout pin (or simply “pin”) refers to a specific location in the layout. A pin can be defined as a single point, an edge, or an area (see Figure 1). The blue color denotes a pin in all three cases; it may be difficult to see the point pin in Figure 1 since the blue color is just a dot at the tip of the arrow.
Figure 1: Momentum layout pin types: point, edge, and area
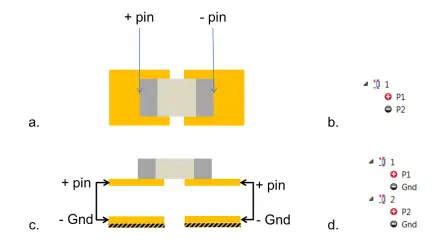
In a Momentum simulation, the user may combine pins together in various configurations to create S-Parameter ports. For example, a user could define one positive pin and two negative pins combined together into a single port, yielding a Ground-Signal-Ground (GSG) configuration for coplanar waveguide structures. This is possible because Momentum supports S-Parameter ports with multiple positive pins and/or multiple negative pins. The ground reference for an S-Parameter port can be either “explicit” (Figure 2b) or “implicit” (Figure 2d). “Explicit” means one or more pins set the location of the ground reference for that port. “Implicit” ground (denoted by “Gnd” in the EM Setup view) means there is no layout pin denoting the location of ground, and Momentum will use the nearest infinite ground plane; in the absence of an infinite ground plane, Momentum will use the zero scalar potential at infinity i.e. “ground at infinity”. What all of this means is that you have a choice when co-simulating Momentum and two-terminal Modelithics models: either set up a single port spanning across the device (Figure 2a, denoted as “differential” configuration) or set up two ports (one on each pad), each referenced to the nearest ground plane (Figure 2c, denoted as “single-ended” configuration).
Figure 2: Location of + and – pins for (a.) differential port configuration, and (c.) single-ended configuration. Pin assignments for (b.) differential and (d.) single-ended ports in the EM Setup window.
However, one should use caution with a differential port configuration across a two terminal device. Treating the device as an equivalent pi-network with shunt impedances to ground on either side (Zg1 and Zg2), the differential port will effectively put Zg1+Zg2 in parallel with the series impedance of the pi-network. This occurs with the Modelithics library because the shunt components in the models are assumed to be connected to the reference ground. If Zg1,2 are relatively large, as is the case with many small parts models in the low microwave frequency range, then the errors from the differential ports can be negligible; this is the case for the majority of the measurement examples described herein. While the most rigorous approach is to use single-ended port configurations, it may be more convenient to use differential port configurations. For example, if a design has a finite ground plane in the layout and a large surface-mount device count, using differential ports eliminates the need to place numerous explicit ground reference pins in the layout. Please note that simulations including finite ground planes were not performed for this application note.
Other important port considerations involve the pin size and separation distance of the positive and negative pins. A good rule of thumb is to keep the distance between the plus and minus pins smaller than 10% of the wavelength at the highest simulation frequency. Additionally, it is important to know that if a layout pin is placed on the edge of a metal polygon, by default the entire edge is used to excite the structure. Therefore, the edge should be smaller than 10% of the wavelength at the highest simulation frequency. Because of this, special care is needed when placing edge pins on large pieces of metal, such as finite ground planes. Finally, if an area pin is defined as a polygon, the largest dimension of the polygon should not exceed 10% of the wavelength of the highest simulation frequency. These guidelines were not critical for the simulations performed for this note because of the sizes of the parts and frequencies of interest.
Momentum Port Calibration Types
TML
The “TML” port calibration (known as “Single Mode” in earlier versions of ADS) is used when a transmission line will be connected to the port. For this port calibration type, Momentum extends the transmission line (or any edge of the layout in contact with the port). A calibration standard (a transmission line of twice the length) is simulated to de-embed the effect introduced by the transmission line. This calibration technique reduces the impact of higher order modes around the source and adds the mutual coupling effect of the transmission line current with the circuit. This calibration technique is recommended when the circuit is indeed fed through long transmission line(s).
TML (zero length):
This calibration can be used for ports connected to short transmission lines (or other edges) in a layout. If the transmission line extensions added during “TML” calibration would intersect with other structures in the layout, then “TML (zero length)” may be used instead. For the “TML (zero length)” calibration, Momentum connects a source directly to the port; no transmission line extensions are added. “TML (zero length)” only removes the fringe capacitance at the edge of the metal; it does not filter out the higher order modes. Momentum will automatically use “TML (zero length)” calibration (and issue a warning) if “TML” calibration is chosen but the transmission line extension would intersect with other polygons on the same metal layer.
Delta Gap
“Delta Gap” calibration is used to quickly and easily add parasitic effects to an otherwise ideal SMD (e.g. R, L or C) model. When using “Delta Gap” calibration, two layout pins defining the “Delta Gap” calibrated port are placed across a gap between the pads; these pins must be placed on the edges of the metal. The port must be defined differentially across the two edge pins. “Delta Gap” calibration effectively adds a piece of metal extending from each pad inwards, leaving a small gap for the source. Momentum does not de-embed the effects of this metal from the simulation results. This way, some parasitic self-impedance is added as a rudimentary way of modeling the parasitics of the part. This extra bit of metal also models mutual inductive or capacitive coupling between the part and other neighboring traces or parts.
SMD (Surface Mount Device)
When using an “SMD” port calibration, a pair of pins must be placed on the inner edges of a surface mount device’s pads. The port must be defined differentially across the two edge pins. “SMD” calibration is intended for use with surface mount device models that already include the parasitics of the part itself (i.e. self-impedance). “SMD” calibration stretches the two pads toward each other, leaving a small gap for the source. This effectively adds a little piece of metal in between the two pads to capture the mutual coupling to nearby circuitry. Momentum models the additional metal to create a “calibration standard” which is used to de-embed the self-impedance of the extended metal; however, the mutual impedance (capacitive and/or inductive coupling to nearby circuitry) is not de-embedded from the simulation results. Since this mutual impedance to neighboring traces is not part of typical SMD component models, the “SMD” calibration can be a simple way to model this effect. The key difference between “Delta Gap” and “SMD” calibration is that “Delta Gap” keeps the self-impedance added by the extra bit of metal, while “SMD” removes it.
None (Uncalibrated)
There is also the option to use uncalibrated ports in Momentum. These ports were previously called “Internal” ports in older versions of ADS. Now, they are simply called “None”. Uncalibrated ports can be placed anywhere within the circuit (not limited to boundaries between dielectrics and conductors) and may excite a single point, an edge, or an area. Uncalibrated ports may be defined using a single pin referenced to implicit ground (“Gnd”), or by using multiple positive pins and/or multiple negative pins. Sometimes uncalibrated ports are the best choice for modeling how devices are connected to a circuit.
For further information concerning calibration types, please refer to the ADS documentation.
Options for Including Pads in Simulations
Modelithics models include a feature that allows for the removal of the pad effects from the model. Simulation mode 2 (Sim_mode 2) provides the designer with the flexibility of using custom pad geometries by including the pads in the EM simulation, while disabling the pads in the Modelithics model. When enabled, this feature effectively shifts the reference planes from the outer pad edge to the component input. The entire pad is removed, including any portion that extends under the component. It should be noted that the default Sim_mode setting is 0 (zero) – in this mode, all parasitics, including pad effects, are included in the model’s performance.
A second feature that affects pad handling is Pad_mode. Pad_mode, in conjunction with Sim_mode, determines whether the pads are included in the layout. When the Pad_mode is set to 0, pad handling defaults to the Sim_mode setting. That is, with Pad_mode set to 0 and Sim_mode set to 2, the pads are not included in the layout nor are the effects included in the model. The default Pad_mode setting is 0 (zero). Other Pad_mode and Sim_mode setting configurations will allow the designer to disable the pad effects from the model but include the pads in the layout. This helps reduce the chances of duplicating the pad effects during co-simulation. For more information concerning Pad_mode and Sim_mode, please refer to the Modelithics Library User Manual.
Note that Sim_mode 0 should not be used in conjunction with differential Momentum ports. This includes uncalibrated differential ports, as well as “SMD” and “Delta Gap” calibrated ports. Using Sim_mode 0 along with any of these types of differential ports will likely result in noticeable errors since the device model will include the pads (modeled primarily as shunt capacitance to ground), and differential ports improperly treat this shunt capacitance to ground. Therefore, Sim_mode 2 should be used with differential ports in most cases, else the capacitance of the pads effectively reduces the shunt impedance (Zg1,2) thus increasing the likelihood of simulation errors.
Results
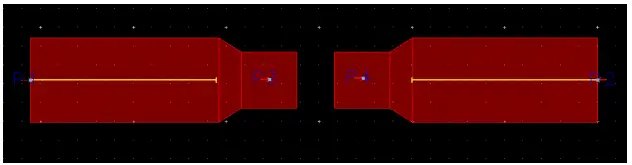
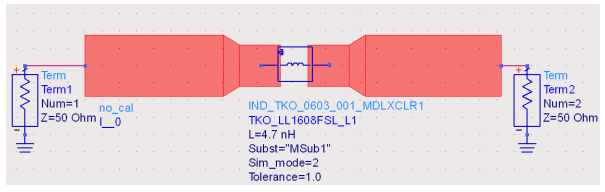
To explore the differences in Momentum port types, a 4.7 nH Toko 0603 inductor was measured on a 20 mil Rogers substrate in a series configuration. Various Momentum port types were then used and the results were compared. Figure 3 shows the layout that was simulated and fabricated for measurements; the yellow lines represent de-embedding (i.e. reference offset) in Momentum. The lead-in transmission lines were de-embedded both in simulation and in measurement, such that the reference plane for the final S-Parameters is located at the outermost edges of the tapers. Figure 4 shows the co-simulation schematic, which includes the Modelithics model and the “emModel” for Momentum. Note that ADS includes “layout lookalike” as an option for the schematic symbol, a useful feature that helps visualize all circuit connections and aides in schematic simulations.
Figure 3: ADS layout for Toko 0603 inductor
Figure 4: ADS schematic including the Modelithics model and the Momentum emModel.
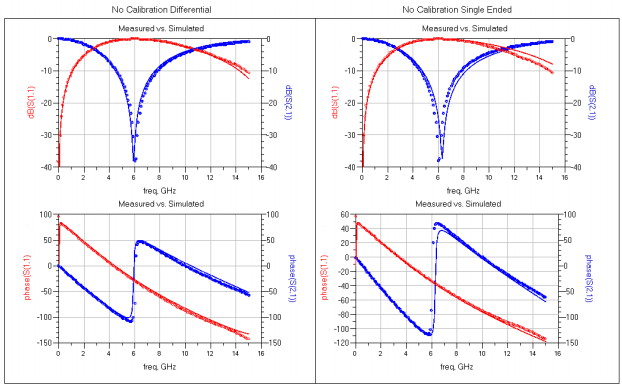
Figure 5 shows the S-Parameters resulting from setting the calibration type to “None” and comparing single-ended vs. differential point ports. Note that both configurations give reasonable results, with the differential setup resulting in slightly closer agreement to measured data.
Figure 5: Comparing differential vs. single-ended ports for a Toko 0603 inductor. . LEGEND: solid lines – simulated data, circles – measured data.
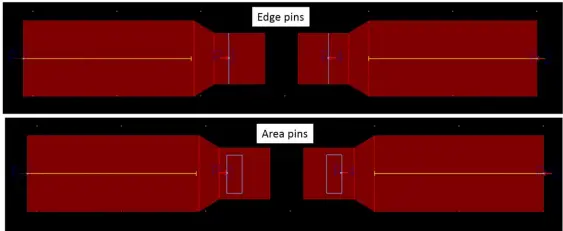
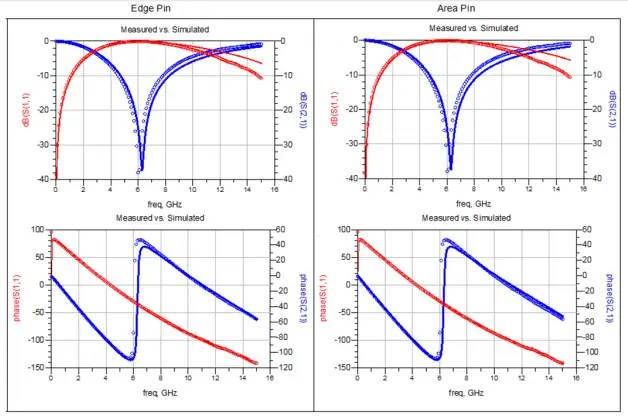
Figure 6 shows the layouts used for another experiment that was performed using the same Toko inductor. These layouts were created to examine the effect of using edge or area pins. Each edge pin and area pin was set up as a single-ended uncalibrated (“None”) port. Figure 7 shows the results. From this experiment (and others not shown here), it was concluded that adding an edge pin to model the width of the part or an area pin to model the area of solder does not typically improve the measurement to model comparison.
Figure 6: Layouts for edge pin setup and area pin setup
Figure 7: Simulation results using Momentum edge (left column) and area (right column) ports. . LEGEND: solid lines – simulated data, circles – measured data.
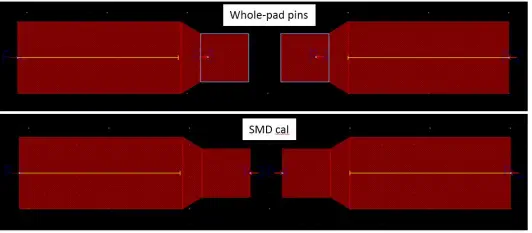
The results from two additional tests done using the Toko inductor are shown below: 1) using an area port that covers the whole pad, and 2) using “SMD” calibration. Figure 8 shows the modified port setups for the whole-pad area pins and “SMD” calibration. Note that “SMD” calibration requires that the pins be placed on the edges of the pads; the layout pins defining any “SMD” calibrated ports must be placed on a boundary between a dielectric and a conductor.
Figure 8: Layouts for whole-pad area excitation and SMD calibration
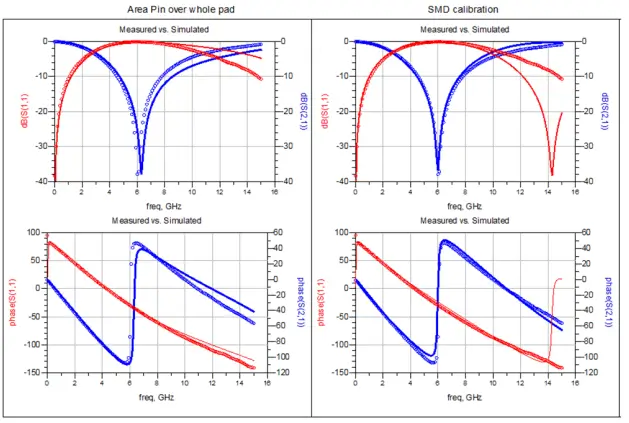
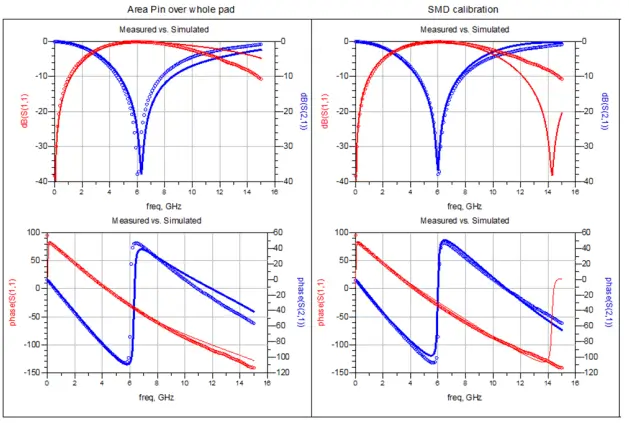
Figure 9 shows the results. Both of these experiments led to slightly worse results when compared to uncalibrated point ports. Using a whole-pad area pin as a port forces the entire pad to be at the same voltage potential. This effectively removes the series inductance from the pad, causing a slight shift in resonant frequency. “SMD” calibration for this case caused a self-resonance in the magnitude of S(1,1) to appear within the observed frequency range.
Figure 9: Comparing whole-pad area pins vs SMD calibration for a Toko 0603 inductor. LEGEND: solid lines – simulated data, circles – measured data.
Results from a final experiment using the Toko inductor are shown below in Figure 10. “TML (zero length)” calibrated ports were used. These ports must be placed on the edge of the pads (same placement as “SMD” calibration). Note that the simulation deviates further from measurement than uncalibrated point ports. This is the expected result since “TML (zero length)” ports must be placed on the edges of the pads, which does not reflect the placement of the real part. The actual placement of the part is in the middle of the pads, resulting in some pad length before the part and some pad length after the part. In addition, “TML (zero length)” removes fringing capacitance from the edge of the pad that should be included to best emulate the physical configuration.
Figure 10: Comparing TML (zero length) calibration vs measured data for Toko 0603 inductor. LEGEND: solid lines – simulated data, circles – measured data.
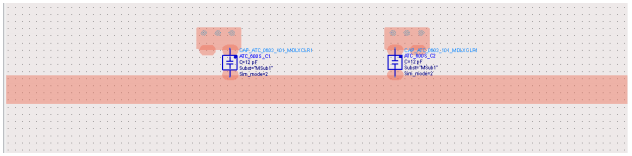
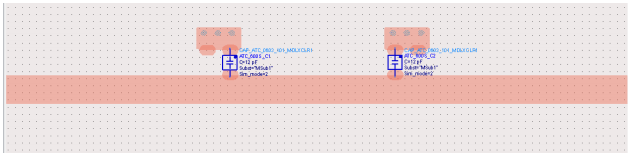
Similar experiments were performed on a structure with two shunt capacitors. The parts used were ATC 0603 capacitors on a 30 mil Rogers 4003C substrate. The schematic with the Modelithics models and the layout look-alike symbol is shown in Figure 11.
Figure 11: Schematic for co-simulation between Modelithics models and Momentum for shunt capacitors structure
Several port setups are explored below for the shunt capacitor structure, including a comparison of point vs area excitation. Figure 12 shows a zoomed-in view of an area excitation setup in the layout. Note that the entire pad area was used as a port.
Figure 12: Area port setup. The blue color represents a pin.
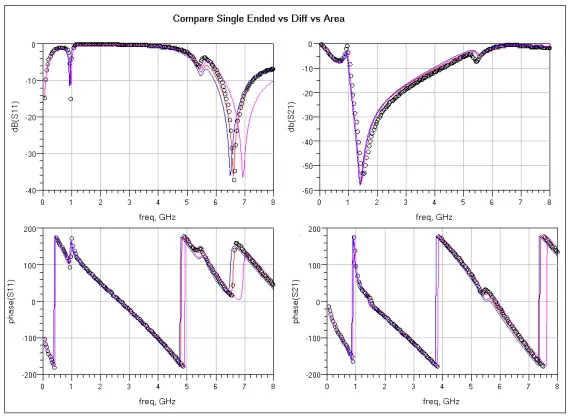
Figure 13 shows a comparison between the S-Parameters obtained from differential point ports, single-ended point ports, and single-ended area ports for the shunt capacitor configuration. The best comparison to the measurement data is obtained using the point differential ports, followed by the point single-ended ports, and finally the area ports. As mentioned previously, the reason using whole-pad area ports causes a shift in the resonant frequency is that they force the same voltage potential across the entire pad, eliminating the series inductance of the pads.
Figure 13: Results of the comparison between the differential ports, single-ended point ports, and area ports. LEGEND: BLACK circles – measured data, RED – differential ports, BLUE – single-ended ports, MAGENTA – area ports.
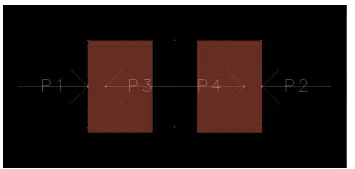
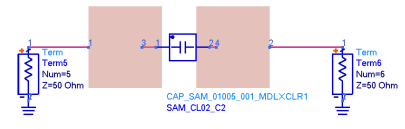
The next results consider a Samsung 01005 capacitor mounted on a 4-mil Rogers 4350C substrate. The EM simulation consists of only the pad geometry (Figure 14) used for the capacitor measurements. In Figure 14, pins 3 and 4 define the port for the capacitor and pins 1 and 2 define the ports for the pads to connect to external circuitry. The S-Parameter calibration type for ports defined by pins 1 and 2 is “TML”, whereas “None” was used for the ports defined by pins 3 and 4. Two EM simulations were performed for the co-simulation comparisons. One EM simulation employed single-ended ports for pins 3 and 4 while the second EM simulation employed differential ports.
Figure 14: Layout of land pad geometry
The co-simulation setup is shown in Figure 15. Upon completion of the EM simulation, Momentum stores the EM simulation data results in an “emModel” view. The schematic representation of the EM model data is the “layout look-alike” symbol (square pads in Figure 15). The co-simulation is accomplished by placing the symbol in a schematic and setting the Modelithics model Sim_mode equal to 2.
Figure 15: Schematic symbol for co-simulation for Samsung 01005 capacitor.
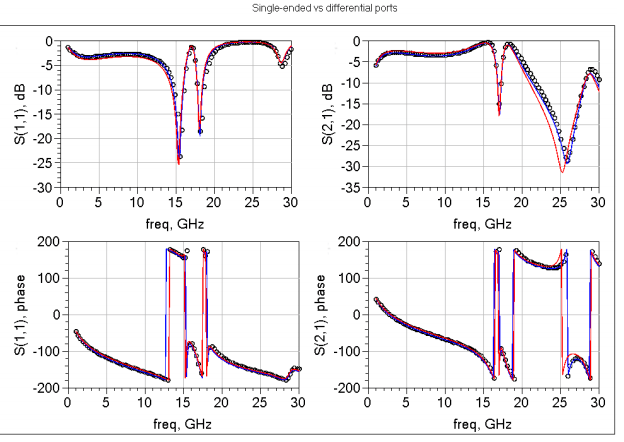
The results of both co-simulations are shown in Figure 16. The black circles represent the measured data, the solid red line is the simulated differential port arrangement, and the solid blue is the simulated single-ended port configuration. It is apparent when looking at the magnitude and phase of S21 that the single-ended port setup is slightly better than the differential port configuration.
Figure 16: Co-simulation results vs measured data using uncalibrated single-ended and differential ports for a 1 pF Samsung 01005 capacitor on 4 mil Rogers 4350C substrate. (Modelithics model CAP-SAM-01005-001). LEGEND: RED – differential, BLUE – single-ended, and BLACK circles – measured data.
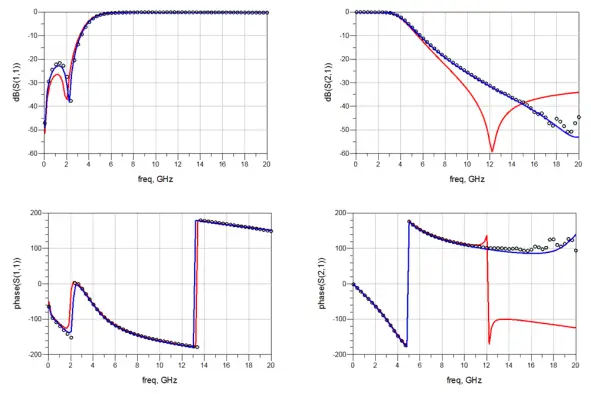
The results of another experiment testing for differences between single-ended and differential port configurations are shown in Figure 17. It is a simulation of a Coilcraft 0805CS inductor on Rogers 4 mil substrate. The results show how the improper treatment of shunt impedance by the differential ports can result in a deviation from measured data.
Figure 17: Co-simulation results vs measured data using uncalibrated single-ended and differential ports for a 3.3 nH Coilcraft 0805 inductor on 4 mil Rogers 4350C substrate. (Modelithics model IND-CLC-0805-102). LEGEND: RED – differential, BLUE – single-ended, and BLACK circles – measured data.
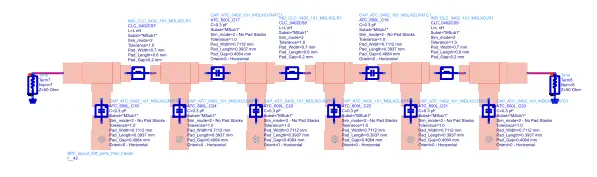
A more complicated co-simulation of a bandpass filter is presented below (Figure 18). The filter circuit consists of 0402 inductors and 0402 capacitors on a 16-mil thick substrate. The ports were set up in a single-ended configuration, with calibration type set to “None”.
Figure 18: ADS Schematic for co-simulation of bandpass filter.
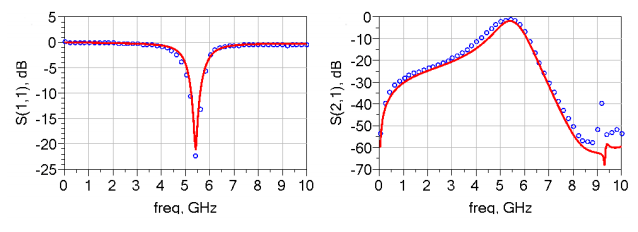
Figure 19 displays the results of the co-simulation for the bandpass filter compared to measured data. The results show very good agreement between the measured data and the co-simulation results. This example demonstrates the accuracy of the co-simulations for a combination of series and shunt inductors and capacitors.
Figure 19: Measured vs co-simulation of bandpass filter. BLUE – measured data, RED – co-simulation
Recommendations
Based on a large set of sample configurations, of which only a small number have been described herein, the following recommendations are made for Momentum port setup:
1) Port calibration type should be set typically to “None” when using Momentum in conjunction with Modelithics models. There are two different port configuration choices when using uncalibrated ports for a two-terminal device: single-ended (each port referenced to ground) or differential (a positive pin is referenced to an explicit negative pin). Differential ports are set across the component (see Figure 2a). One should use caution with a differential configuration since it improperly treats any shunt impedance to ground within the device model. Both single-ended and differential configurations gave reasonable results for the majority of the parts examined for this paper, since most small parts have relatively large internal shunt impedances (when compared to their series impedances). However, using differential ports for some parts did result in noticeable deviation from measured data. Because of this, it is preferable to use single-ended configurations when possible. However, uncalibrated differential port configurations across two-terminal Modelithics models can be considered, especially when a design includes finite ground plane(s). Differential port configurations are more convenient in the presence of finite ground(s) since they eliminate the need to place explicit ground reference pins in the layout. Note that the above recommendations and comments apply when using Sim_mode = 2 for the Modelithics models. For Sim_mode = 0, there will be additional shunt capacitance from the pads included in the model, and the use of differential ports in that situation is more likely to result in large errors. Therefore, it is recommended to avoid using differential port configurations in conjunction with Sim_mode = 0.
2) For the numerous test cases simulated for this paper, it was found that using edge or area pins to try to model the width of the part or the area of the solder does not improve the results over point pins. Edge ports and small area ports tended to yield similar results as point ports, while area ports covering the whole pad tended to yield results which deviated from measured data. This is because whole-pad area ports cause the voltage potential to be constant over the pad, which eliminates the inductance of the pads.
3) The new “Delta Gap” calibration should not be used since Modelithics models already include parasitics. “Delta Gap” modeling of parasitics will typically be less accurate than the measurement-based methods Modelithics uses for parasitic modeling.
4) “SMD” calibration could possibly be used in conjunction with Modelithics models in order to model the interactions between the part and any neighboring parts or traces. However, the test cases performed for this note did not show that “SMD” calibration consistently improved the results over using “None”. In fact, sometimes “SMD” calibration provided less satisfactory comparisons to measurement results (in contrast to the “None” setting). The fact that “SMD” calibration did not improve the match to measured data was not that surprising, considering the fact that this calibration method is meant to model the coupling between nearby parts or from parts to nearby traces. The test layouts considered in this paper did not have parts closely spaced together or traces routed along parts. “SMD” calibration should only be used if part-to-part coupling or part-to-trace coupling is thought to be an important “first-order effect” to model for a particular design. Note that since “SMD” ports are differential, they carry the same implications as uncalibrated differential ports with respect to the treatment of internal shunt impedances in the model.
5) The “TML (zero length)” calibration should not be used to connect Modelithics models to Momentum-simulated pads. If the pads are not simulated in Momentum but instead included in the Modelithics model, it may be suitable to use “TML (zero length)” calibration to connect the Modelithics model (which includes the pad) to the adjacent transmission lines, vias, etc. simulated by Momentum. However, this was not tested for this note since all simulations performed herein used Momentum to simulate the pads.
Conclusion
Recommendations for performing Momentum co-simulations with Modelithics models were presented. When using Modelithics models in co-simulations, the Momentum port calibration should typically be set to “None” (uncalibrated). The pins should typically be placed in the middle of the pads where the ends of component will land, not on the edges of the pads. Either single-ended or differential port setups may be used. However, one should first understand the implications of using differential configurations. Point pins can be used instead of edge or area pins. Small area pins and edge pins may perform satisfactorily but are unnecessary, and whole-pad area pins should be avoided.
Models and Software Used in this Application Note
The models used in this application note are from Modelithics CLR library version 9.6. Momentum in Keysight’s ADS version 2013.06 was used to perform the simulations.
About this note
This note was authored by Scott Skidmore (Modelithics) and Jason Boh (Keysight Technologies). The helpful feedback comments by Dr.-Ing. Volker Mühlhaus are most appreciated and led to an update to the origional application note being developed and posted, with clarifications in particular related to the use of differential ports in combination with Modelithics CLR Library models.
Contact Information
For more information about Modelithics’ products and services, please contact Modelithics, Inc.,
Email ~ sales@modelithics.com / Web ~ www.modelithics.com
For more information about Keysight Technologies’ products, please see www.keysight.com